Exploring the New Scenes Menu in Nanome 2.0: A Guide
Nanome has always been at the forefront of immersive molecular visualization, and with the release of Nanome 2.0, we’re excited to introduce a host of new features designed to enhance your structure based drug discovery workflows. One of the standout additions is the Scenes Menu, a powerful tool that revolutionizes how you manage and interact with molecular structures within Nanome.
In this blog post, we’ll delve into the intricacies of the new Scenes Menu, explaining how it works and how you can leverage it to let the structures themselves guide your research and strengthen your collaborative efforts.
What is the Scenes Menu?
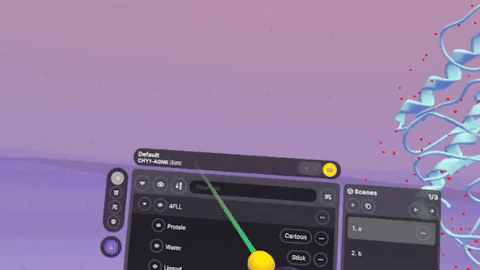
The Scenes Menu in Nanome 2.0 serves as a central hub for managing different views and arrangements of your molecular structures. Think of scenes as snapshots or layouts that capture specific representations, orientations, and visual settings of your molecules. This feature allows you to switch between different scenes seamlessly, making it easier to compare structures, highlight specific interactions, or present findings to collaborators in memorable, narrative ways.
Key Features of the Scenes Menu
1. Easy Navigation and Management
- Accessible from All NavBar Options: The Scene Menu is conveniently located and remains visible regardless of which option you have selected in the navigation bar. This constant accessibility ensures that you can switch scenes or manage them without interrupting your workflow.
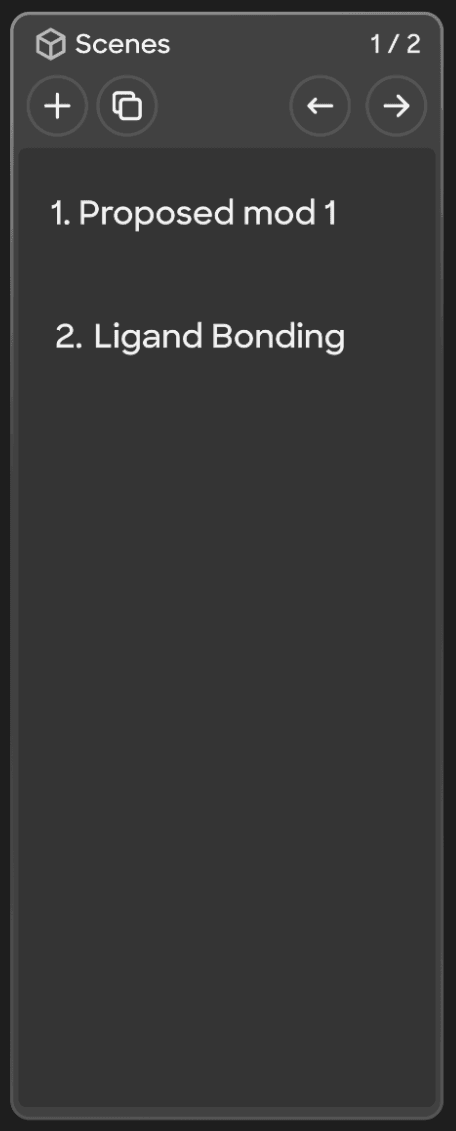
- Create, Duplicate, and Delete Scenes: You can create new scenes from scratch or duplicate existing ones. Duplicated scenes inherit all the settings from the original, allowing you to make minor adjustments without altering the original scene.
2. Independent Representations
- Fresh Representations in New Scenes: When you create a new scene, you’ll have a clean slate to work with. Customized Views: Each scene can have its own unique representations, orientations, and visibility settings. This customization enables you to tailor each scene to highlight specific features, while your sequence of scenes becomes an organized informational story.
3. Seamless Collaboration
- Shared Scenes in Collaborative Sessions: When collaborating with others, scenes become a powerful way to guide discussions. You can spotlight a scene, allowing others to follow your perspective and see exactly what you’re seeing.
- Pointers and Avatars: Nanome 2.0 features updated, individual pointers that are relative to the structures. These pointers have scene indicators that everyone can see. Even when users are in different scenes, pointers help maintain context by indicating where others are focusing.
How to Use the Scenes Menu
Creating a New Scene
Access the Scene Menu: From any navigation bar option, locate the Scene Menu on the side panel.
Create a New Scene: Click on the “New Scene” button. A fresh scene will be created.
Customize Your Scene:
- Load Structures: Import the molecular structures you wish to include.
- Set Representations: Choose how you want to represent different parts of the molecule (e.g., ribbons, sticks, surfaces).
- Arrange Structures: Move and scale structures as desired. For multiple structures, arrange their relative positions by briefly toggling the “Arrange Structures” feature on, and independently moving the structures to the desired positions.
Duplicating an Existing Scene
- Select the Scene: In the Scene Menu, choose the scene you want to duplicate.
- Duplicate: Click on the “Duplicate Scene” option. A copy of the scene will appear in the scenes menu, next position.
- Modify as Needed: Adjust the representations or orientations without affecting the original scene.
Switching Between Scenes
- Simple Selection: Click on the scene you want to view. The workspace will update to reflect the selected scene’s settings.
- Spotlight Feature: If you’re leading a collaborative session, you can spotlight yourself while in a scene to ensure all participants are viewing the same scene and perspective as you. Likewise, you may choose to Follow another user to move to the scene and perspective of their current focus.
Tips for Maximizing the Scene Menu
- Organize Your Scenes: Give each scene a descriptive name to easily identify its purpose (e.g., “Active Site Close-up,” “Ligand Binding Comparison”).
- Utilize the Spotlight: When presenting, use the spotlight feature to guide your audience through your scenes smoothly.
- Coordinate with Collaborators: Encourage team members to create and share scenes, fostering a collaborative environment where everyone can contribute visual insights.
Conclusion
The Scenes Menu in Nanome 2.0 is more than just a feature; it’s a paradigm shift in how molecular visualization and collaboration are conducted. By allowing users to create, manage, and share customized scenes, Nanome empowers researchers to explore complex molecular structures in a more organized and intuitive manner.
Whether you’re analyzing protein-ligand interactions, comparing conformational changes, or presenting findings to your team, Scenes the flexibility and control you need to enhance your workflow.
Ready to experience the new Scene Menu? Get started with the Nanome AI Early Access Package Today! https://nanome.ai/nanome-ai/